Sunday, November 20, 2005

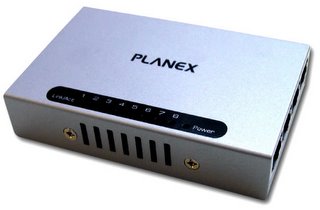
Widget - Planex FX-08Mini 8-Port 10/100Mbps Switch

Having recently acquired an IBM Thinkpad T42, it became a real frustration connecting to the internet since I also already have 2 other laptops, a Toshiba Qosmio F20 and a Toshiba Dynabook AX, and only 1 ethernet port in the room.

The T42 does have WiFi, though the connection can sometimes be intermittent, often dropping down to a mere 1mbps. So I was off again to Akihabara to get myself an ethernet switch.

The Planex FX-08Mini 8-Port 10/100Mbps Switch is a pleasant sight given its very low form factor. A mere 20(L)x94(W)x 62(H)mm, about the size of a regular deck of cards.

More importantly, it packs 8 whopping ports on its small metallic body. Additionally, power can be drawn from an available USB port, so it really goes well with my idea of going fully mobile. It does come with a 5V AC adapter, but unfortunately the voltage is set at 100-120V, so it's pretty much limited in use if you travel to other countries often.

For only ¥2,150, I consider this item a very good buy. There are of course cheaper switches such as those from Elecom and lesser-known brands ranging from ¥1,300-1900, although aside from just having 4 ports they're just made from plastic.

Here are some hard specs to chew on:

Access Method: CSMA/CD 10/100Mbps
Standards Conformance: IEEE802.3 10BASE-T
IEEE802.3u 100BASE-TX
IEEE802.3x Flow Control
Supported Media: UTP/STP cable 10Mbps: Category 3 or greater
100Mbps: Category 5 or greater
Port Configuration: 10/100BASE-TX x 8 ports (all ports support Auto MDI/MDI-X)
Data Transfer Rate: 100BASE-TX 100/200Mbps(half/full duplex)
10BASE-T 10/20Mbps(half/full duplex)
Automatically detected via Auto-Negotiation
Buffer Memory Capacity: 768KB
MAC Addresses: 1,024
Switching Fabric: 1.6Gbps
LED Indicator: Link/Act
Switching Method: Store-and Forward
Flow Control: Full Duplex: IEEE802.3,~, Half Duplex: Back Pressure
Cooling Fan: None (fan-less switch)
Magnet: on the bottom face
Chassis Material: Metal
Power Consumption: 3.0W max. DC5V 350mA
Operating Temperature: 0 to 40 degrees Celsius
Operating Humidity: 35 to 85% (non-condensing)
Weight: 200g

Sunday, November 13, 2005

How To - Converting an OGM to DivX AVI


OGM is another common wrapper for audio and video formats (like MKV).

So here's my process, tested 100% to work with Anime fan subs and whatever you might be able to throw at it.

Software you will need:
1. VirtualDubMod - a modification of VirtualDub, incorporating many plugins into the original program.
3. QuickTime Pro - used for decoding AAC files
4. Advanced WMA Workshop* - you can use any other audio converter you prefer, i use this for converting from OGG and other audio files.
5. VirtuaDub - the main man. Note, it is possible to use VirtuaDubMod instead, but i won't be covering that here.
6. Subtitler - VirtualDub plugin for using subtitles
7. SRT to SSA converter - SSA is the subtitle format used by VirtualDub
8. LAME - for MP3 encoding

Step 1: Demux the OGM.
1. Load your OGM file into VirtualDubMod.
2. Go to Streams->Stream List.
3. Select the one with the description "OGG Media File text stream" (usually the first text stream is English) and click Demux.
4. Select your desired audio stream (usually the first audio stream is English).
5. If the audio stream is in WAV, click Save WAV, otherwise click Demux.
5. Go to the Video menu and click Direct stream copy.
6. Click File->Save As... and select AVI file format.
7. Choose the output directory and filename.
8. You should now have 3 files ready for processing.


The next steps are thesame as the MKV to DivX conversion guide.


Step 2: Convert Audio files to WAV
1. Do your own thing here. If you did not get a WAV file from step 1, you need to convert it now. Be sure to preserve the length of the audio track. Be careful not to introduce or remove any silence at the beginning (some programs automatically do this, so disable that setting).
2. Additionally, if you are converting from AAC, I recommend QuickTime for this. Use the Export command and select WAV.

Step 3: Convert SRT to SSA
1. Load your SRT file in SRT to SSA converter (The program's title is actually Conversor SRT a SSA).
2. Choose the output directory and filename.
3. Adjust the settings as you would like. I just changed the font color from yellow to white though.
4. Click Convert

If you get the error Input file error, subtitle # 1, open the SRT file in notepad and change the encoding from unicode to ANSI.

Step 4: Convert to DivX AVI
- If you haven't, install LAME by right-clicking on the .inf file and clicking Install.
- If you haven't, install Subtitler by copying the .vdf file to the Plugins folder of virtual dub.

1. Open the video file in VirtualDub
2. Go to Video->Filters, load Subtitler and load your SSA file where it says Sub Station Alpha v2.x/4.x filename. Yes, that means the SSA filename.
3. Also in the Video menu, click Full Processing.
4. Still in the Video menu, click Compression and choose DivX. Adjust the settings as you would like. But I otherwise keep it on default.
5. Go to Audio->Wav source... and load your WAV file.
6. Also in the Audio menu, click Full Processing.
7. Still in the Audio menu, click Compression and choose LAME. Adjust the settings as you would like. I use 128kbps at 44.1Khz.
8. Click File->Save as AVI.
9. Choose the output directory and filename. Click Save.

It should now start processing. You may want to unselect Show input video and Show output video to increase performance.

If you get the Audio Compression not possible error:
Virtualdub cannot encode something at 44.1kHz Stereo if the source is 48kHz or mono etc. The reason you are getting the error is because you are encoding the stream without converting the input to match the selected compression type. So, make sure that you select the right options for your input audio - if you have a 48kHz stream then choose that as the encoding option.

Saturday, November 12, 2005

How To - Converting an MKV to DivX AVI


Have you ever encountered files with a .MKV extension? Perhaps you have been able to play them on your computer. But what if you wanted to play it on your DivX hardware?

This is a really tough process right now. There are programs out there such as RiverPast Video Cleaner which claims to be able to do this easily, but in my experience all you get is choppy video, or usually nothing more than just corrupted files.

In most cases VirtualDubMod may work for you. But it is not 100% fool-proof and you won't discover the flaws until you have watched it yourself.

So here's my process, tested 100% to work with Anime fan subs and whatever you might be able to throw at it.

Software you will need:
1. MKVextractGUI - a GUI wrapper for Moritz Bunku's MKVextract.
2. MKVToolNix - needed by MKVExtract
3. QuickTime Pro - used for decoding AAC files
4. Advanced WMA Workshop* - you can use any other audio converter you prefer, i use this for converting from OGG and other audio files.
5. VirtuaDub - the main man
6. Subtitler - VirtualDub plugin for using subtitles
7. SRT to SSA converter - SSA is the subtitle format used by VirtualDub
8. LAME - for MP3 encoding

Step 1: Demux the MKV.
- If you haven't, copy the files of MKVToolnix to the directory of MKVExtract. If you get DLL errors, you were not able to copy everything. Try downloading the RAR archives instead and copying all of it.

1. Load the MKV file in MKVExtract by clicking Browse and select the appropriate file.
2. Check the boxes next to the tracks you want under Tracks/attachments/chapters/tags
- select the video, an audio, and a subtitle track
- the 1st audio and subtitle tracks are usually english
3. Choose the output directory
4. Click Extract.
5. You should now have 3 files ready for processing.

Step 2: Convert Audio files to WAV
1. Do your own thing here. We just need the WAV files. Be sure to preserve the length of the audio track. Be careful not to introduce or remove any silence at the beginning (some programs automatically do this, so disable that setting).
2. Additionally, if you are converting from AAC, I recommend QuickTime for this. Use the Export command and select WAV.

Step 3: Convert SRT to SSA
1. Load your SRT file in SRT to SSA converter (The program's title is actually Conversor SRT a SSA).
2. Choose the output directory and filename.
3. Adjust the settings as you would like. I just changed the font color from yellow to white though.
4. Click Convert

If you get the error Input file error, subtitle # 1, open the SRT file in notepad and change the encoding from unicode to ANSI.

Step 4: Convert to DivX AVI
- If you haven't, install LAME by right-clicking on the .inf file and clicking Install.
- If you haven't, install Subtitler by copying the .vdf file to the Plugins folder of virtual dub.

1. Open the video file in VirtualDub
2. Go to Video->Filters, load Subtitler and load your SSA file where it says Sub Station Alpha v2.x/4.x filename. Yes, that means the SSA filename.
3. Also in the Video menu, click Full Processing.
4. Still in the Video menu, click Compression and choose DivX. Adjust the settings as you would like. But I otherwise keep it on default.
5. Go to Audio->Wav source... and load your WAV file.
6. Also in the Audio menu, click Full Processing.
7. Still in the Audio menu, click Compression and choose LAME. Adjust the settings as you would like. I use 128kbps at 44.1Khz.
8. Click File->Save as AVI.
9. Choose the output directory and filename. Click Save.

It should now start processing. You may want to unselect Show input video and Show output video to increase performance.

If you get the Audio Compression not possible error:
Virtualdub cannot encode something at 44.1kHz Stereo if the source is 48kHz or mono etc. The reason you are getting the error is because you are encoding the stream without converting the input to match the selected compression type. So, make sure that you select the right options for your input audio - if you have a 48kHz stream then choose that as the encoding option.