Monday, January 09, 2006

Widget - Sony 4GB and 8GB Memory Stick Pro Duo


Still in CES, Sony unveiled their latest gadgets and accesories. What caught my eye was the new Sony 4GB and 8GB Memory Stick Pro Duos that promise to increase mobile storage capacities.

I'm eyeing the 4GB one for my PSP and Sony Ericsson P910i. I'm just not sure if they would be able to use all that space right away, specially the 8GB version since the PSP as I recall can only support up to 4GB. Perhaps Sony will address this with another firmware update.

These would probably enter the market at a very high price, as they usually do. But we can expect the older models such as 1GB and 2GB Memory Stick Pro Duos to get some further price cut. Here in Japan, a 2GB sells for ¥15,000 or about $130. I've seen them go for $110 on eBay though. The high-speed 2GB version retails for about ¥24,000.

No price quotes are available as of this time.

Sunday, January 08, 2006

Wet Dream - Western Digital D1500AFHD RaptorX


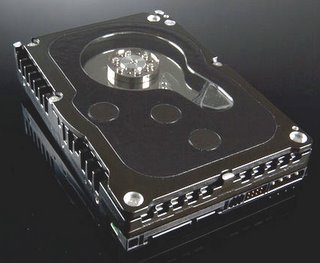
In this week's CES in Las Vegas, WD presented its latest offering to tech enthusiasts. The Western Digital D1500AFHD or simply the RaptorX gaming hard disk features a clear viewing window for the platter and the head.

The material is made from a special grade of crystalline polycarbonate developed by WD labs for 2 years. Aside from this innovation, the RaptorX also has a rotation speed of 10,000rpm - something previously only present on SCSI hard drives.

The capacity of 150Gb is a bit on the low side though, but if you need performance and beauty at any price, this baby is the right one for you.

Don't be fooled though, you can only see a portion of the insides of the hard disk through the small window. The rest of it is covered with black-ish material, but cool none the less.

Mod enthusiasts, amittedly myself included, have been trying achieve the same, but often with disastrous results. The RaptorX may not be perfect, but it sure is a step in the right direction. Get yours now for only $349.99.

Monday, January 02, 2006

Troubleshooting - "Page cannot be displayed" or "xyz.com could not be found"

I was in a predicament a while ago. I first noticed the symptoms when my bittorrent client (BitComet) could not connect to any peers other than for those in the DHT network.

When I tried browsing the internet, I'd get "Page cannot be displayed" intermitently, sometimes a refresh will do the trick, or refreshing until internet explorer says "Opening xyz..."

This went on for a good part of 5 hours before I found the solution. At first I thought it was problem with the bittorrent client since I was under a NATted corporate firewall. So I got myself BitSpirit, hoping that it could somehow punch through the security. No go.

Next I looked at transparent http proxy tunneling. These sevices will route all your traffic through your http proxy, usually at port 80 or 8080. There was HTTP-tunnel, but unfortunately even at just the Test connection step, it could not connect to its own servers. Fat chance.

I then browsed for anonymous proxy lists and found some hand full ranging from Croatia to India, from the Philippines to Mexico. I then filtered the list using batch ping and tracerts to get rid of the ones that have been taken down.

I still had about around 20 proxies left. I then *manually* changed the internet explorer settings and restarted the browser for each of these. Though I could browse the internet, it still had the same problem, intermittently showing the "Page cannot be displayed" every so often. It was really getting annoying.

Finally as a last resort, I tried resetting the TCP settings by:

netsh int ip reset c:\resetlog.txt

and then running:

http://downloads.subratam.org/WinsockFix.zip

After a short reboot, viola! I was back on track again. =D

Everything worked perfectly after that. No more browser page reloads, and the peers connected smoothly.

It just left me wondering how it happened in the first place... hmnhh...

Monday, December 26, 2005

Bling Bling - Tulip E-Go Diamond Laptop


Tulip, known for its unique design of laptops that look like handbags has launched a new design called the E-Go Diamond.

The Tulip E-Go notebook is inlaid with solid palladium white gold plates set with a total of 80Crt in thousands of tiny brilliant-cut diamonds. Additionally, both Tulip logos on the unit are set with square-cut rubies.

I wonder how it puts up on usability testing though. Those diamonds could give you some nasty abrasions, not to mention leaving those brilliant-cut marks on you forearm during extended use.

The Tulip E-Go Diamonds's hardware is just about the same as the other E-Go laptops, though not quite something to balk at, not a real performance demon either.

But for its size and design, the suggested retail price of €283,000 could be a bargain gift for the woman who has everything. Happy Holidays!!


Here's some raw specs on this baby:

Processor: AMD Turion 64 Processor MT family
Chipset: ATI Radeon Xpress 200 (built-in video)
Memory: 1Gb PC3200 DDR
Screen: 12.1" Widescreen WXGA with backlight inverter
Max Resolution: 1280 x 800
Harddisk: 100 GB (SATA)
Optical drive: DVD RW
Others: Webcam, 802.11abg, Bluetooth 1.2, Internal Microphone, Integrated stereo, PC CARD SLOT, ExpressCard, 4xUSB 2.0, 100 Mbit RJ45, S-Video, Combined SD/MMC/MS/MS Duo

Saturday, December 03, 2005

How to - Undervolt your Laptop


A couple of posts ago, I mentioned how hot my brand new Qosmio F20 390LS1 laptop was running in. It came to the point the it was so annoying, thinking that I have made a bad purchase and possibly lead to the early failure of the components such as the hard disk etc.

I went about tinkering with the goal of lowering the CPU and motherboard temperatures, and possibly at the same time lessen the frequency that the on-board fan kicks in.

I had several choices:

1. Open up the case and apply heat-reduction techniques (like in a desktop)
2. Buy external kits such as fans and heatsinks
3. Lower the maximum clock speed of the CPU (i.e. Underclock)
4. Lower the voltage required by the CPU (i.e. Undervolt)

As I am currently in Yokohama, sadly far from Akihabara and can't buy the 'neat stuff', option 1 and 2 were out at least until I can get back there.

Option 3 wasn't really inviting since that would mean i would be putting a cap on the maximum speed of my processor.

And so it was left to option 4, Undervolting. If you are not sure what undervolting is, perhaps i can put it this way: Overclocking would be like buying an ordinary sedan and making it run like a Ferrari, whereas Undervolting would be buying a Ferrari and making its gas consumption like that of a mini.

Undervolting doesn't limit the speed of the processor at all. Processors are not created equal, yes even those that came out of the same batch. Some of them can run at faster speed (hence the overclock), and some can run at lower voltages (hence the undervolt). However, all of them can run at the original clock speed and voltage the manufacturers intended.

Like overclocking, with undervolting, your mileage may vary. Even if you hear that someone undervolted to an awesomely low level, yours may not even come close to that even if you have the exact same system.

A word of warning before you start. You will be configuring your laptop to specifications it was never meant to run in. Since there can be an infinite amount of possible configurations, some of the advices that follow may not apply to you. Use your good judgment as we go along.

Note: The following steps will only work on a Pentium M.

Software you will need:
1. Notebook Hardware Control - This is what we are going to use to adjust the CPU voltage. Has tons of other interesting features too.
3. Prime95 - This will be our stress testing tool. There are of course a lot of other programs out there.

Step 1: Finding the lowest stable operating voltage.

If you haven't installed the above-mentioned programs yet, install them now.

1. Try to simulate the worst ambient temperature that you will be using your laptop in. It is pretty cold here in Japan right now given that it's almost winter. I turned up the heater a bit to simulate summer conditions.

2. Ensure that you are using AC power source. This could take long.

3. Launch Prime95.exe, select Options->Torture Test. Select "In-place large FFTs", and click OK. It should now begin making calculations. Constantly monitor this window for any errors that might occur.

4. Launch Notebook Hardware Control. Go to the "CPU Speed" tab and select "Max performance" on both AC and DC power sources. On the same tab, Enable "Enable custom dynamic switching" and "Switch only between min and max multiplier". Verify that your system's lowest and highest and speed multipliers are the ones listed next to the icon with the power plug. Ensure that the settings shown on the status dislay on the lower portion of the window are the settings you want to modify.

5. Still in Notebook Hardware Control. Go to the "CPU Voltage" tab. Take note of the current voltage settings. You may want to note them down for future reference. Scroll down until you see your system's highest speed multiplier on the "On Multiplier of" column. Enable the checkbox next to it. On the "Set voltage" column, select the next lower voltage of your selected multiplier on the drop down list. Click "Set". NHC will perform its own stress testing on your machine for about 30 seconds, however, keep an eye on Prime95 and ensure that it is still running and has not encountered any rounding errors.

6. If you do not encounter any errors in Prime95, lower the voltage again in NHC. Remember to press "Set". Continue lowering the voltage and checking Prime95 until you encounter an error. This could take some time since there are a lot of voltage settings to go through. If you are the adventurous type, you may want to skip a few notches.

7. If Prime95 encounters an error, you will have to set the voltage setting in NHC up a step or two until you no longer encounter any errors. The Prime95 stress test will stop if it encounters an error, so you may have to do Step 3 again after you make the adjustment. Please note that some systems may become unstable immediately and cause the system to hang, lose display or display the blue screen of death. In which case, restart your system. The last successful settings will be retained in NHC.

8. After you have determined the lowest operating voltage, adjust it up by a step or two, this will serve as a buffer in case of any voltage fluctuations.

Step 2: Stability Testing.

1. Run Prime95 for a few hours, maybe even overnight. If you get an error, adjust the voltage setting up by another step. Let it run until you no longer get any errors.

2. While still running Prime95, perform the following actions in any order. We will now try to make your laptop fail by trying to fluctuate the voltage.

a. Remove and connect the power cord on your laptop.
b. Insert and remove PS/2, Firewire and USB devices.
c. Insert a cd/dvd on your optical drive and read from it.
d. Copy files over to a floppy disk or external device.
e. Browse the net.
f. Anything else you can think of.

After ensuring that your system is running fine on this multiplier and voltage setting, you may want to undervolt the other multipliers, most especially the lowest multiplier. Repeat the above steps as necessary. Also, remember to change the maximum or minimum multiplier setting in the "CPU Speed" tab accordingly. You may also want to enable the "Use only multiplier #1 and Voltage #1" checkbox instead of juggling around in dyanmic switching.

Benefits gained from Undervolting

I was quite impressed by the impact of undervolting. My Pentium M Sonoma 1.60 was able to go at 12x from 1.356V to 0.972V! A staggering improvement using only 71% of the original voltage at maximum speed. I also maxed (misnomer) out the settings in NHC and was able to go as low as .700V from .988V at 6x, also at 71% of the original!

I am still not quite sure of the tangible benefits though as it is still too soon to say. However, this should result in longer battery life, lower power consumption, lower CPU heat emission, lesser frequency of fan activation, and an overall wellness of being knowing that you have pwned your laptop!

As of the time of this writing, my CPU temperature is at 45C and the motherboard is at 40C. Now if that is not worth it, i don't know what is.

I would just like to remind you again that you should at all times be careful with these programs and the steps provided, use them at your own risk. They are not made for the faint of heart. Use your common sense.

Sunday, November 20, 2005

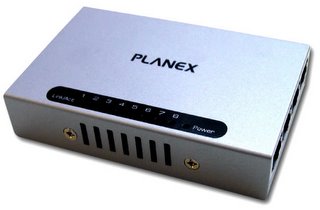
Widget - Planex FX-08Mini 8-Port 10/100Mbps Switch


Having recently acquired an IBM Thinkpad T42, it became a real frustration connecting to the internet since I also already have 2 other laptops, a Toshiba Qosmio F20 and a Toshiba Dynabook AX, and only 1 ethernet port in the room.

The T42 does have WiFi, though the connection can sometimes be intermittent, often dropping down to a mere 1mbps. So I was off again to Akihabara to get myself an ethernet switch.

The Planex FX-08Mini 8-Port 10/100Mbps Switch is a pleasant sight given its very low form factor. A mere 20(L)x94(W)x 62(H)mm, about the size of a regular deck of cards.

More importantly, it packs 8 whopping ports on its small metallic body. Additionally, power can be drawn from an available USB port, so it really goes well with my idea of going fully mobile. It does come with a 5V AC adapter, but unfortunately the voltage is set at 100-120V, so it's pretty much limited in use if you travel to other countries often.

For only ¥2,150, I consider this item a very good buy. There are of course cheaper switches such as those from Elecom and lesser-known brands ranging from ¥1,300-1900, although aside from just having 4 ports they're just made from plastic.

Here are some hard specs to chew on:

Access Method: CSMA/CD 10/100Mbps
Standards Conformance: IEEE802.3 10BASE-T
IEEE802.3u 100BASE-TX
IEEE802.3x Flow Control
Supported Media: UTP/STP cable 10Mbps: Category 3 or greater
100Mbps: Category 5 or greater
Port Configuration: 10/100BASE-TX x 8 ports (all ports support Auto MDI/MDI-X)
Data Transfer Rate: 100BASE-TX 100/200Mbps(half/full duplex)
10BASE-T 10/20Mbps(half/full duplex)
Automatically detected via Auto-Negotiation
Buffer Memory Capacity: 768KB
MAC Addresses: 1,024
Switching Fabric: 1.6Gbps
LED Indicator: Link/Act
Switching Method: Store-and Forward
Flow Control: Full Duplex: IEEE802.3,~, Half Duplex: Back Pressure
Cooling Fan: None (fan-less switch)
Magnet: on the bottom face
Chassis Material: Metal
Power Consumption: 3.0W max. DC5V 350mA
Operating Temperature: 0 to 40 degrees Celsius
Operating Humidity: 35 to 85% (non-condensing)
Weight: 200g

Sunday, November 13, 2005

How To - Converting an OGM to DivX AVI


OGM is another common wrapper for audio and video formats (like MKV).

So here's my process, tested 100% to work with Anime fan subs and whatever you might be able to throw at it.

Software you will need:
1. VirtualDubMod - a modification of VirtualDub, incorporating many plugins into the original program.
3. QuickTime Pro - used for decoding AAC files
4. Advanced WMA Workshop* - you can use any other audio converter you prefer, i use this for converting from OGG and other audio files.
5. VirtuaDub - the main man. Note, it is possible to use VirtuaDubMod instead, but i won't be covering that here.
6. Subtitler - VirtualDub plugin for using subtitles
7. SRT to SSA converter - SSA is the subtitle format used by VirtualDub
8. LAME - for MP3 encoding

Step 1: Demux the OGM.
1. Load your OGM file into VirtualDubMod.
2. Go to Streams->Stream List.
3. Select the one with the description "OGG Media File text stream" (usually the first text stream is English) and click Demux.
4. Select your desired audio stream (usually the first audio stream is English).
5. If the audio stream is in WAV, click Save WAV, otherwise click Demux.
5. Go to the Video menu and click Direct stream copy.
6. Click File->Save As... and select AVI file format.
7. Choose the output directory and filename.
8. You should now have 3 files ready for processing.


The next steps are thesame as the MKV to DivX conversion guide.


Step 2: Convert Audio files to WAV
1. Do your own thing here. If you did not get a WAV file from step 1, you need to convert it now. Be sure to preserve the length of the audio track. Be careful not to introduce or remove any silence at the beginning (some programs automatically do this, so disable that setting).
2. Additionally, if you are converting from AAC, I recommend QuickTime for this. Use the Export command and select WAV.

Step 3: Convert SRT to SSA
1. Load your SRT file in SRT to SSA converter (The program's title is actually Conversor SRT a SSA).
2. Choose the output directory and filename.
3. Adjust the settings as you would like. I just changed the font color from yellow to white though.
4. Click Convert

If you get the error Input file error, subtitle # 1, open the SRT file in notepad and change the encoding from unicode to ANSI.

Step 4: Convert to DivX AVI
- If you haven't, install LAME by right-clicking on the .inf file and clicking Install.
- If you haven't, install Subtitler by copying the .vdf file to the Plugins folder of virtual dub.

1. Open the video file in VirtualDub
2. Go to Video->Filters, load Subtitler and load your SSA file where it says Sub Station Alpha v2.x/4.x filename. Yes, that means the SSA filename.
3. Also in the Video menu, click Full Processing.
4. Still in the Video menu, click Compression and choose DivX. Adjust the settings as you would like. But I otherwise keep it on default.
5. Go to Audio->Wav source... and load your WAV file.
6. Also in the Audio menu, click Full Processing.
7. Still in the Audio menu, click Compression and choose LAME. Adjust the settings as you would like. I use 128kbps at 44.1Khz.
8. Click File->Save as AVI.
9. Choose the output directory and filename. Click Save.

It should now start processing. You may want to unselect Show input video and Show output video to increase performance.

If you get the Audio Compression not possible error:
Virtualdub cannot encode something at 44.1kHz Stereo if the source is 48kHz or mono etc. The reason you are getting the error is because you are encoding the stream without converting the input to match the selected compression type. So, make sure that you select the right options for your input audio - if you have a 48kHz stream then choose that as the encoding option.